Hey! Hey! Hey!
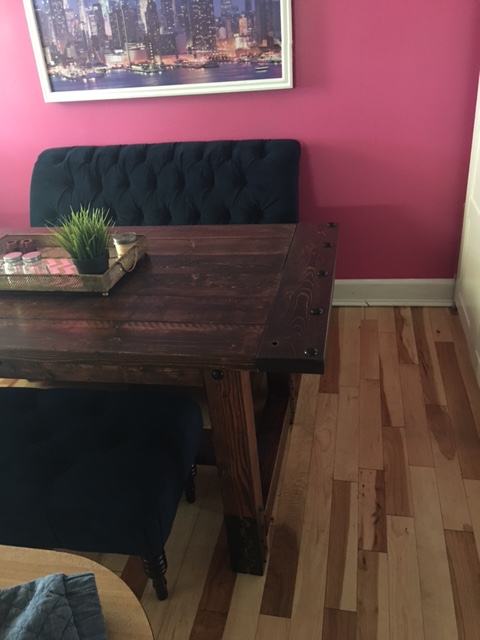
So if you follow me on Instagram you know that I built a farmhouse table! YAY! YAY! I am so excited that I was able to complete this project and I love it!

So let me start with how I decided to build a farmhouse table. There were two different challenges that caught my eye, but both were in October…ugh. One of the challenges was the “One Room Challenge”. You are given 6 weeks to completely restyle/redo a room of your choice and you must blog about something that you did in the room each week. The other challenge was the #IGBuildersChallenge. This was a 2 week challenge, where building plans were provided and you would have to build according to the plans but put your own spin/style on it. With this challenge you weren’t provided with the plans until the evening before the challenge began. As you all know I chose the #IGBuildersChallenge because it was a shorter challenge and I only had to focus on one thing.


Let’s talk pros and cons.
Pros:
- Short challenge
- One item
- Out of my comfort zone, but not crazy
- I needed a dining room table
- Allowed me to show creativity
Cons:
- I don’t have a workshop or garage, so I had to work in my front yard and I had to deal with the elements
- The wood was heavy and it’s just me lifting these items
- First timer so I was learning as I was going along


I can’t tell you how many times I talked myself out of doing this challenge. Sometimes I don’t trust my skills and doubt myself a lot. This challenge helped me to see the worth in my work. I would definitely build this table again, for a nice price (wink, wink)!!
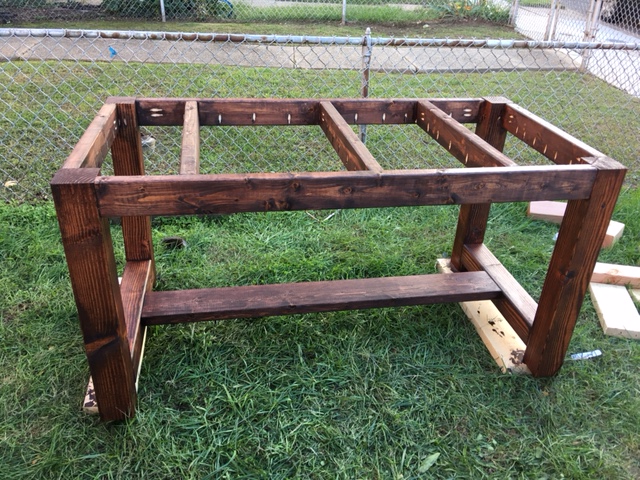
Okay, let’s get into this table! I started a week late, but the good thing about starting late was that the weather was in the 80s. I spent a long time in the Home Depot trying to figure out what type of detail I was going to use. I ended up going with joist brackets and Crown MetalWorks Black Decorative Nail Heads for the legs. I spray painted the joist brackets with Rustoleum Universal satin black spray paint. By the way, I put 2 brackets on each leg and each bracket has 10 screw holes, so let’s do some multiplication:
4 legs x 2 brackets = 8 brackets
10 screw holes x 2 brackets = 20 screws on each leg
20 screws holes x 4 legs = 80 screws

So that was 80 screws that I had to spray paint and screw into the legs of the table using a socket wrench. CRANK! CRANK! CRANK! Good thing my SUPERMAN was around to assist me with that. We worked well together on those legs and brackets. A Sunday afternoon well spent. (BTW, I screwed all 80 screws into a piece of wood so that I could spray paint them.)

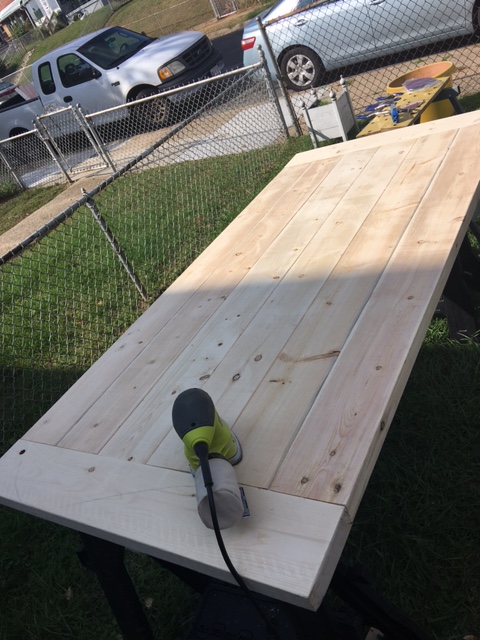
For the table top I decided to use 2 Crown MetalWorks garage door handles and Crown MetalWorks Black Decorative Nail Heads. Those decorative details gave it the rustic charm I was after.


I had 2 stains on hand, Varathane Carrington and Sunbleached. The Sunbleached stain didn’t look that great so I went with the Carrington and I was very satisfied, hey y’all saw the pictures, pretty right! This was very easy stain to use. I didn’t realize that I was doing it the long way. I was painting on the stain with a foam brush and then wiping it off with a cloth. I realized that if I had just used the cloth to wipe the stain on and off I could have moved much faster, but hey you live and you learn. I used Varathane Triple Thick Polyurethane 3x in the Satin finish. I only did one coat because I really wanted the farmhouse effect, but I have kids so I needed a good protector. I brushed that on with a Blue Hawk Angle Sash paint brush and actually loved the brush strokes. Before staining I applied Minwax Wood Conditioner with a foam brush. Because of the wonderful weather the stain and the poly dried fast.


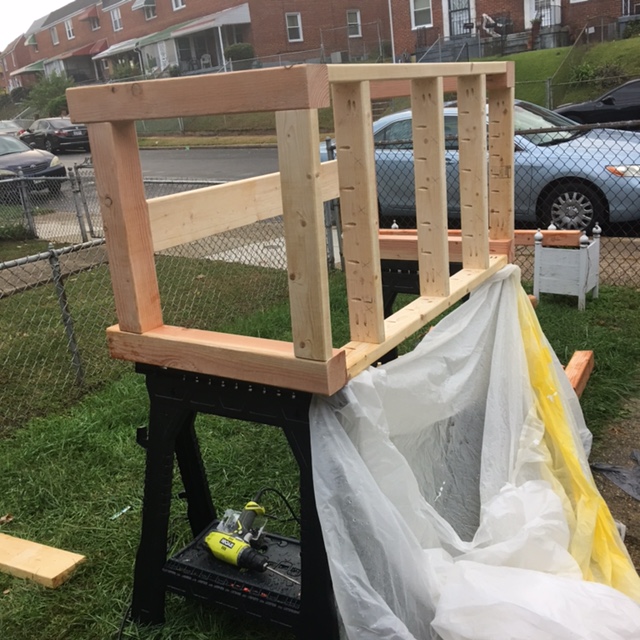
I was able to attach the table to the base by using the Kreg Jig screws and pocket holes. I used the Kreg Pocket Hole Jig because it was easier to move around on these large pieces of wood. I didn’t connect both pieces until we were in the house.
There were some things I had to deal with while building this table:
- It RAINED and it rained HARD!!!
- I had to create a makeshift tent, while the base was still on the sawhorses.
- I was by MYSELF, except on Sunday when SUPERMAN helped me CRANK those screws.
- The top was HEAVY as crap and I almost dropped it several times.
- I cut some of the wood wrong and I had to re-cut it.
- I was in my FRONT YARD!
- I had to deal with the rain.
- I worried about my table pieces being stolen at night.
- I worried about my tools being stolen.
- The bugs were attacking my ankles.
- The grass is not leveled and so was my walkway.
- I kept smiling because I saw butterflies.


All in all I LOVE my table!!! I want to build more for other people, but first I need a workshop!! Who can help me with that?!?!?! I am truly happy that it was a challenge because I probably would have never finished the table. So now it’s back to Dior’s room! Maybe I should create my own little challenge so that I can get that done in a timely fashion…lol.

